Are you looking for a professional business email address like name@yourdomain.com but don’t know how to set it up?
In this guide, we’ll walk you through step by step how to:
✅ Create a business email address for FREE using Hostinger (works for Bluehost, Namecheap & most hosting providers).
✅ Connect that business email with your Gmail so you can send & receive messages from one place.
Why Have a Business Email Address?
- ✅ Professional Branding: Makes your business look more trustworthy (e.g.
support@yourbrand.com). - ✅ Better Management: Separate personal emails from business communication.
- ✅ Gmail Integration: Reply to all emails from your Gmail inbox, no switching needed.

Log in to Hostinger (or Your Hosting Provider)
👉 Go to your Hostinger dashboard and log in.
👉 Click on Emails in the menu – you’ll see all domains linked to your account.
If you don’t have Hostinger yet, you can get it here:
👉 Get Hostinger Hosting (affiliate link)
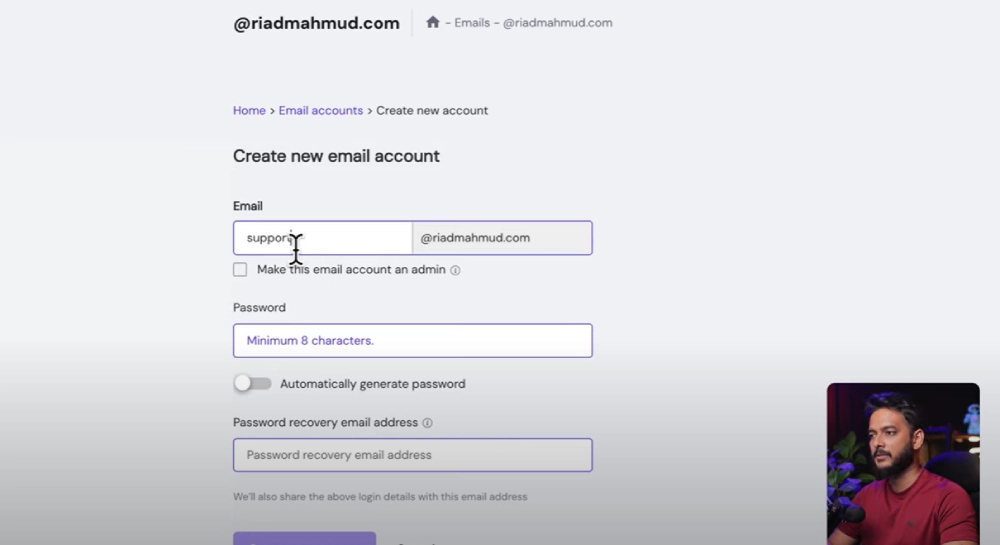
Create Your Business Email Address
- Click Manage under your domain.
- Select Create New Email Account.
- Enter the desired name (e.g.,
support@yourdomain.comoreditor@yourdomain.com). - Set a strong password (or generate automatically).
- Save the email & password somewhere safe (like Notes app).
Access Hostinger Webmail (Titan Mail)
- Click Access Webmail → You’ll see Titan Mail interface.
- You can send & receive emails directly here – but we’ll integrate it with Gmail for easier use.

Configure Gmail to Receive Emails
1️⃣ Open Gmail Settings → See all settings → Accounts and Import.
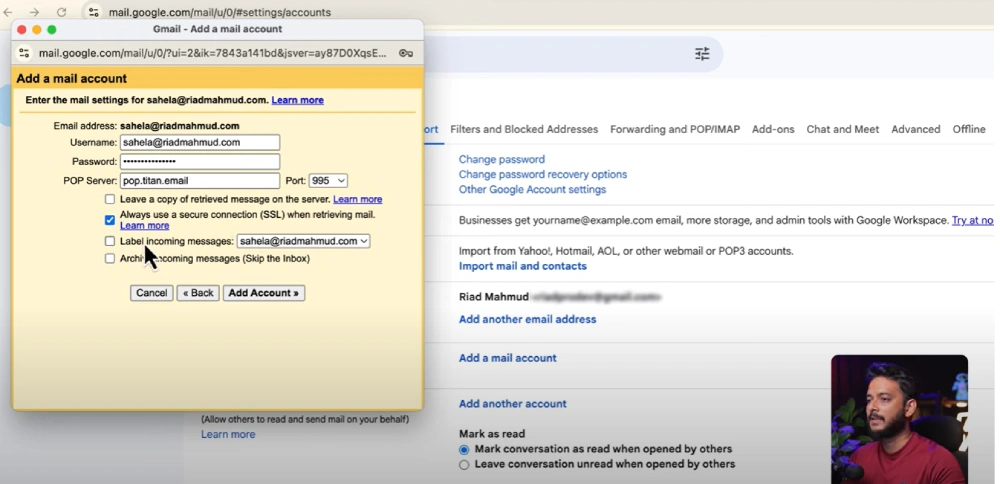
2️⃣ Under Check mail from other accounts, click Add a mail account.
3️⃣ Enter your business email address → Click Next.
4️⃣ Use POP3 settings:
- POP server:
pop.titan.mail - Port:
995
5️⃣ Add your username (your email) & password.
6️⃣ Select Always use a secure connection (SSL).
7️⃣ Click Add Account.
Now Gmail will pull your business emails directly into your inbox.
Set Up Gmail to Send Emails (SMTP Settings)
1️⃣ In the same Accounts and Import tab, under Send mail as, click Add another email address.
2️⃣ Enter your name and business email address.
3️⃣ Use SMTP settings:
- SMTP server:
smtp.titan.mail - Port:
465 - Username: Your full email address
- Password: The same password you saved earlier
4️⃣ Enable SSL and click Add Account.
5️⃣ Gmail will send a verification email – click the confirmation link to complete setup.
✅ Done! Your Gmail is now fully connected to your business email.
Resources & Useful Links
- 📥 Hostinger Official Site: https://www.hostinger.com/
- 📖 Titan Mail Help Docs: https://support.titan.email/
- 📘 Gmail Settings Help: https://support.google.com/mail/answer/21289?hl=en
Final Thoughts
By following this guide, you’ve created a free business email address with your hosting provider and connected it seamlessly to Gmail.
This setup helps you:
✅ Look more professional when emailing clients.
✅ Manage all your business emails in one place – Gmail.
👉 If you enjoyed this tutorial, make sure to subscribe to Riad Mahmud’s YouTube channel and leave a comment on the video!

